

Ready to move your email to Epik.com and keep your data intact? Following our step-by-step guide will ensure all your emails come along for the ride. Let’s go!
Step 1
Back Up Your Email Data
First off, you need to back up your email data for this to be successful. It’s crucial to use the same email client for backing up and restoring. We’ll focus on Microsoft Outlook and Apple’s Mac Mail, but the process is very similar for other email clients.
Microsoft Outlook (Using .PST file)
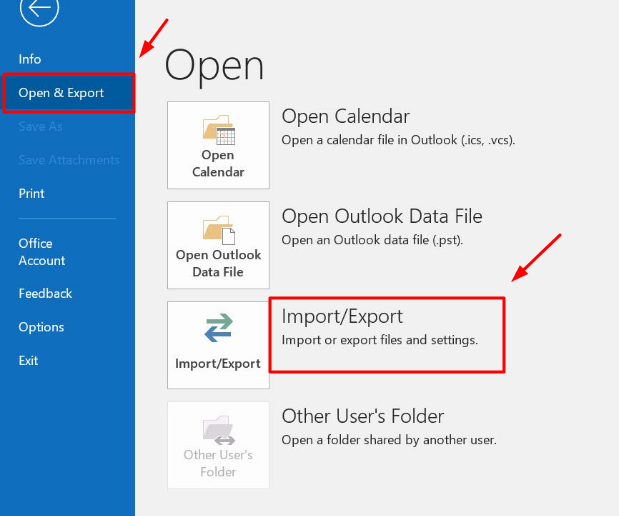
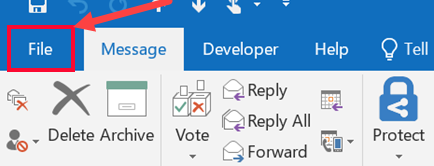
- Open Microsoft Outlook

- Go to Menu > File > Import/Export
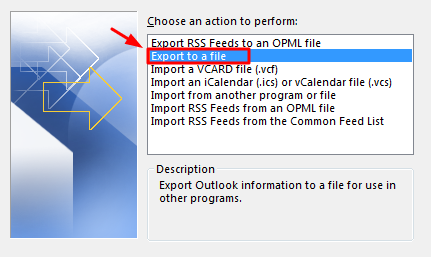
- Select Export to a file
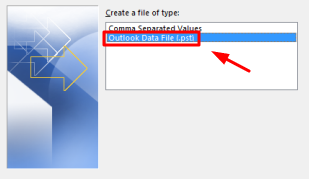
- Choose Outlook Data File (.pst)
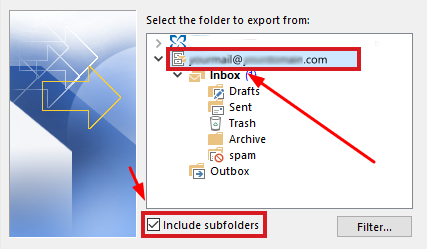
- Select the email you want to backup (the top-most level email), making sure the option “Include subfolders” is checked
- Select the name and location on where to save your exported file – by default it’s saved in your Documents folder as “backup.pst” – and click Finish
- A new window might appear prompting you to save the file with a password. You may do so, just make sure you don’t forget it – otherwise just leave the fields blank and click OK.
Apple’s Mac Mail
For Apple’s Mac Mail, it’s a pretty straightforward process, with the little caveat that you’ll need to make two backups – one for your messages and another one for your contacts. Like Microsoft Outlook, there are different versions of the software, but the process remains very similar.
Backing Up Messages
- Open Mac Mail
- Select the Mailbox you wish to backup;
- Go to Menu > Mailbox > Export Mailbox
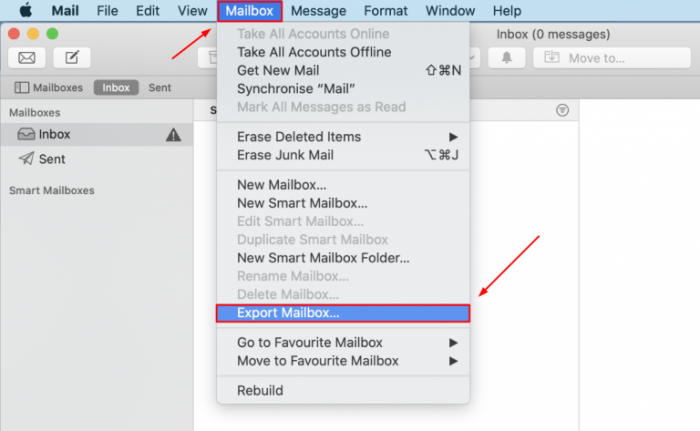
- Specify a safe location for your backup and click Choose
- Repeat these steps for each mailbox, if you have multiple accounts.
Backing Up Contacts
- Open Address Book or Contacts app
- Go to File > Export > Contacts Archive
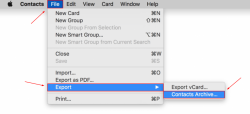
- Choose a safe save location for your backup, and click Save
Step 2
Transfer or Add Your Domain to Epik
If you do not wish to transfer your domains over to Epik you can simply add them to your account as External Domains – simply log into your Epik account, and on the black menu, click Domains > Add Domain(s);
To transfer your domain to our services, you can follow our dedicated guide – How to transfer domains to Epik.
Step 3
Order an Email Hosting Plan (or a Web Hosting Plan)
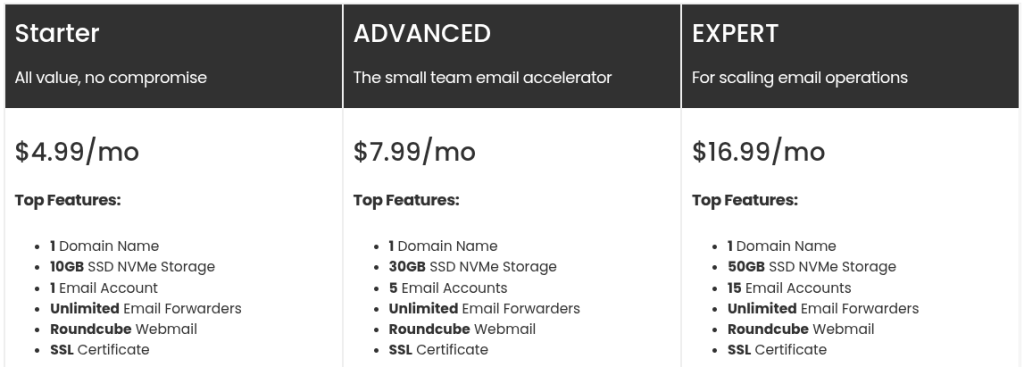
Epik offers three competitive Email Hosting plans – Starter, ADVANCED, and EXPERT, tailor-made to your needs.
If a website is in your near future, you may want to consider our powerful Web Hosting plans, which also include Email Hosting.
Below are the options for Web Hosting.
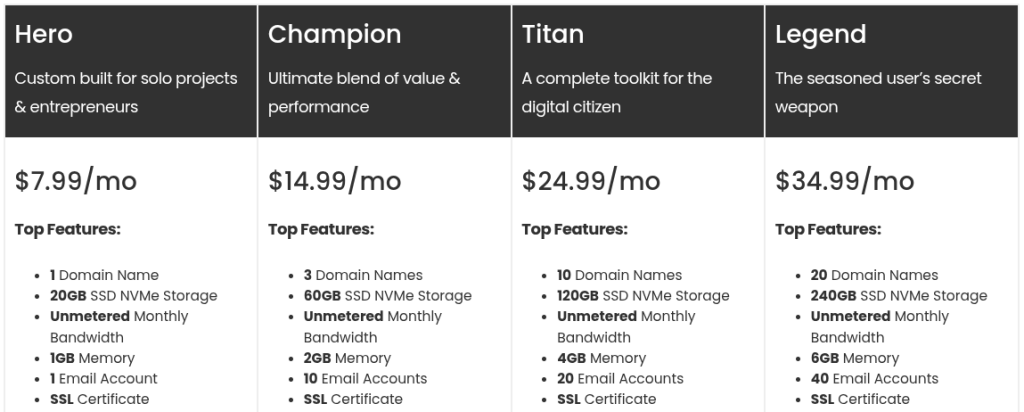
See more information on our plans here:
Email Hosting Plans: https://epik.com/hosting/email/
Web Hosting Plans: https://epik.com/hosting/
Step 4
Configuring the Domain and Accessing your cPanel
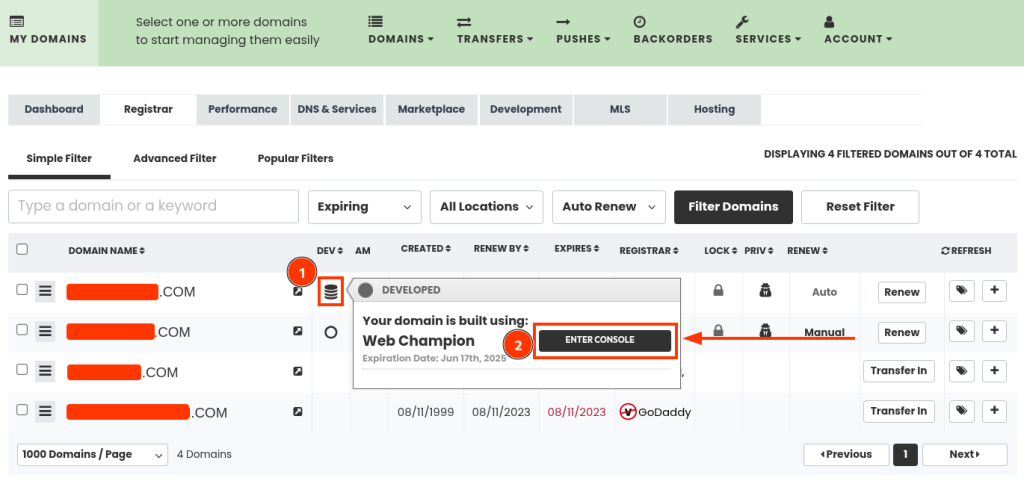
With a hosting solution under your belt, let’s go back to your Domain Dashboard. If you haven’t linked a domain to your plan yet, there will appear a notification asking you to do so. Click Resolve Now, and link your already added or transferred domain.

Next, go back to the Domain Portfolio Dashboard. Under the Dev column, right next to your domain, hover over the black cylinder, which will reveal your current plan. Click Enter Console which will bring you to your Hosting cPanel.
Step 5
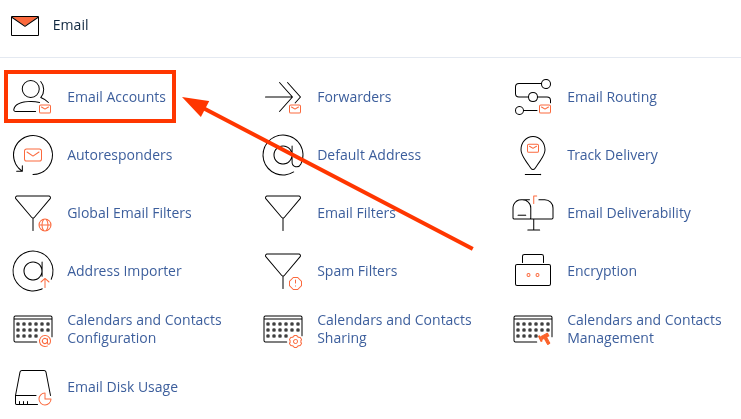
Recreating your Email Accounts
Now that you’re in the cPanel, you’ll need to create all the email accounts that you previously had. Just navigate to the Email section and click Email Accounts.
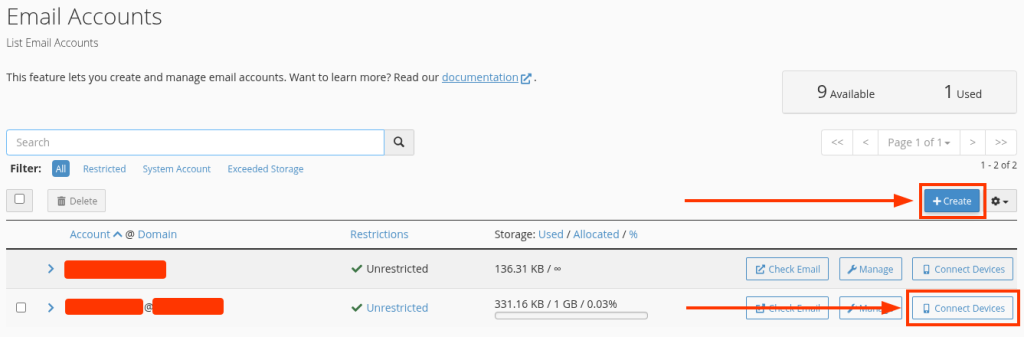
Next, just click “+Create” and fill in the information – you’ll be able to choose the username, password and storage space for your emails. Repeat this process for each email account you want to (re)create.
Going back to Email Accounts you’ll see next to your newly created email account that there’s a button named “Connect Devices”. Here you’ll find all the information your email clients will ask you to provide when trying to login using a custom domain email. You can also download configuration script files for easy accessibility on selected email clients.
Once you’ve recreated all your accounts, you’re ready to change your domain Name Servers to the appropriate ones.
Step 6
Update Your Name Servers
When you’ve completed your hosting plan’s purchase, you’ll have noticed you got an email of confirmation as well as information regarding the appropriate Name Servers to point your domain to.
Important: If your domain is still connected to its former hosting, please note that changing your Name Servers will disconnect you from their hosting, which will prevent you from accessing your old email accounts. Do this only when you’re in control of all your backups and are ready to activate the new email accounts.
Once you’re ready, navigate to your Domain Portfolio Dashboard, select your domain, and click DNS & WHOIS > Set Name Servers. You’ll be taken to a new page, where you can input the Name Servers Epik provided to you on the email. Make sure you input the correct Name Servers to avoid potential outage.

Step 7
Logging In and Restoring Backups
Now that you’re operational, log into your preferred email clients using the new email accounts (and credentials) from step 5 and let’s start restoring the backups we’ve made on step 1.
Microsoft Outlook (using .PST file):
- Open Microsoft Outlook
- Navigate to the File > Open & Export > Import/Export

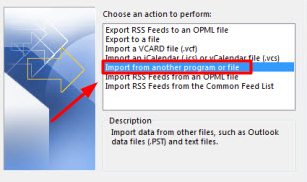
- Choose Import from another program or file
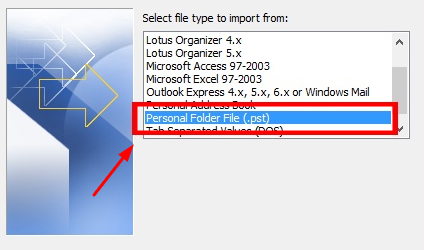
- Select Personal Folder File (.pst)
- Browse and select the backup .pst file you saved at a chosen location, and enter the password if needed
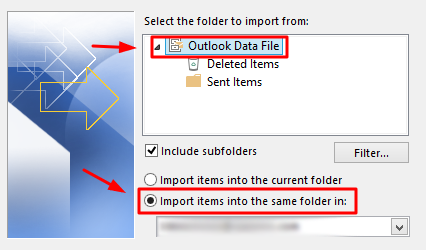
- Choose which existing .pst file you want to import into. Since you’ve just logged in with a “new” account, there’s a default one created. Choose that Outlook Data File with the option Import Items into the current folder and click Finish
Apple’s Mac Mail
Messages
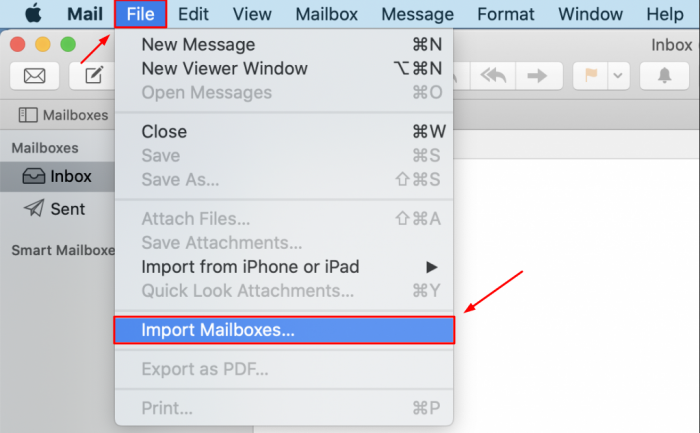
- Open Mac Mail and go to Menu > File > Import Mailboxes
- From the options, choose “Apple Mail” or “Mbox Files”
- Browse/Specify where the backup files are located
- The messages should be in a new mailbox called Import, in the sidebar. Drag them to the desired new/existing mailbox and delete the Import mailbox.
Contacts
- Open your Address Book or Contacts app
- Go to File > Import
- Select the contact backup file and click Open
That’s it! You’ve successfully migrated your email to Epik.com. If you run into any issues or have questions, our support team is here to help.
Welcome aboard and enjoy your new email hosting experience!
FAQ
By default, no. Since we’ll be essentially recreating the email accounts in our services, you’ll need to properly backup your “old” email account in your email client before proceeding with the migration, after which you’ll restore the backup in your “new” email account.
Because email accounts are dependent on where the domain is hosted, since you’ll be moving to a new hosting for your domains, you’re basically changing the home for the domain. If you skipped the backup part, you’d find yourself with a new email without any pre-existing data. If you have two identical email accounts on two different registrar, the emails will only be delivered to where the domain is hosted.
Unfortunately, if you have one of these types of emails and can only use both apps, it’s impossible to back up the email data through the client.
A way around this is to purchase one-month access to Microsoft Outlook from the Office 365 suite with your registrar (which should be around $10 or less) and then repeat the steps on this tutorial. Alternatively, you may contact the Registrar offering these limited services asking if it’s possible to provide the backed-up data file, although there’s no guarantee that they should oblige.
Yes, although it should be very minimal or virtually nonexistent if you do the steps correctly. Unavoidable outage takes place while the domain is in transit during a transfer and while the Name Servers propagate.